सिर का योगासन (Sirshasana)
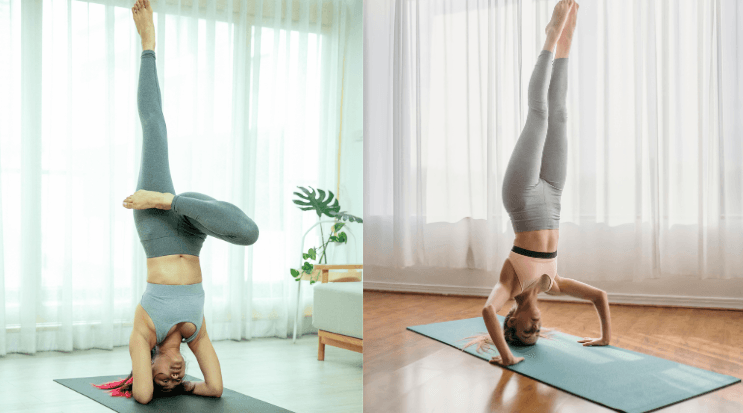
परिभाषा:यह एक आसन है जिसमें आप अपनी कोहनियों, हाथों, और सिर पर संतुलन बनाते हैं। Sirshasana को “योगासन का राजा” कहा जाता है क्योंकि इसके अद्भुत लाभ हैं। सिर का योगासन 12 आसन में पहला है और यह ध्यान केंद्रित करने, याददाश्त बढ़ाने, और यौन ऊर्जा को शक्तिशाली जीवन शक्ति में परिवर्तित करने में मदद करता है। नियमित रूप से इसका अभ्यास करने वाले लोगों की श्वसन और हृदय की दर धीमी होती है। पहले बार अभ्यास करने वालों के लिए यह जानकर आश्चर्य हो सकता है कि इस मुद्रा के लिए विशेष शक्ति या लचीलापन की आवश्यकता नहीं होती है; यह केवल अभ्यास और चरणबद्ध तरीके से आगे बढ़ने की बात है। आप डॉल्फिन मुद्रा से शुरुआत कर सकते हैं और समय के साथ पूर्ण सिर का योगासन कर सकते हैं।
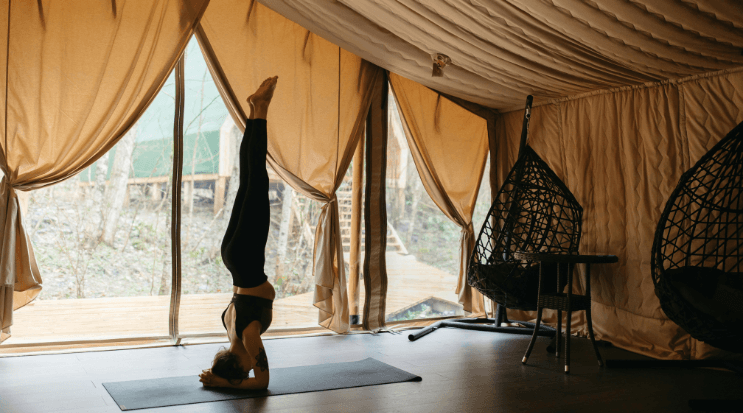
उद्देश्य:पूरे शरीर को आराम और ऊर्जा प्रदान करना।
प्रतिबंध:
सिर का योगासन का अभ्यास नहीं करना चाहिए यदि आपके पास निम्नलिखित समस्याएं हैं:
– उच्च या निम्न रक्तचाप।
– ग्लूकोमा या हाल की आंखों की सर्जरी।
– हाल की गर्दन की चोट।
– मासिक धर्म चल रहा हो।
अभ्यास के चरण
चरण 1 – स्थान को परिभाषित करें:
आगे झुकें, दोनों हाथों को विपरीत कोहनियों के चारों ओर लपेटें और अपनी भुजाओं को अपने घुटनों से लगभग 8 इंच आगे फर्श पर रखें। नितंबों को एड़ियों पर रखें।
चरण 2 – त्रिकोण आधार बनाएं:
कोहनियों को स्थिर रखते हुए, हाथों को आगे बढ़ाएं और उंगलियों को आपस में जोड़ें। इससे आपके हाथों और कोहनियों के साथ एक मजबूत त्रिकोणीय आधार बनेगा, जिसमें सभी तीन बिंदुओं पर समान वजन होगा। मानसिक रूप से पुष्टि करें, “मेरी भुजाएं मेरी टांगें हैं”।
चरण 3 – सिर को फर्श पर रखें:
झुककर अपने सिर के शीर्ष भाग को फर्श पर रखें, कोहनियों और हाथों के त्रिकोण को मजबूती से फर्श पर दबाएं और अपने हाथों को सिर के पिछले हिस्से का समर्थन दें। कोहनियों को न हिलाएं। गर्दन को सीधा रखें।
चरण 4 – घुटनों को सीधा करें और कूल्हों को उठाएं:
सिर या कोहनियों को न हिलाते हुए, घुटनों को सीधा करें और कूल्हों को उठाएं। वजन को कोहनियों पर बनाए रखें। सुनिश्चित करें कि कोहनियां स्थिर रहें।
चरण 5 – पैरों को आगे बढ़ाएं:
पैरों को आगे की ओर बढ़ाएं, कोशिश करें कि घुटने सीधे रहें। जैसे-जैसे पैर सिर के करीब आते हैं, अपनी पीठ को सीधा महसूस करें। तब तक चलते रहें जब तक कूल्हे सिर के ऊपर न आ जाएं। अपने हाथों से बनाए गए समर्थन त्रिकोण पर वजन दबाते रहें।
चरण 6 – घुटनों को सीने की ओर लाएं:
सावधानीपूर्वक पैर को जमीन से उठाएं, घुटनों को सीने की ओर मोड़ें। इसके लिए पेट और कमर की मांसपेशियों का उपयोग करना होगा। पैर को नितंबों की ओर लाएं और इस स्थिति को बनाए रखने की कोशिश करें। पीठ को सीधा रखें। ‘कूदने’ या ‘धक्का देने’ की कोशिश न करें, क्योंकि इससे आप आसानी से संतुलन खो सकते हैं। इसके बजाय, अपने कूल्हों को धीरे-धीरे पीछे की ओर झुकाएं जब तक आप अपनी पीठ में संतुलन का बिंदु न खोज लें। इस स्थिति में, मुड़े हुए पैरों का वजन कूल्हों और नितंबों के वजन से संतुलित होता है। जितना हो सके अपने अग्रभुजाओं और हाथों पर समर्थन बनाए रखें। नियमित रूप से सांस लें और इस आधे सिर के योगासन को एक मिनट तक बनाए रखें।
चरण 7 – कूल्हों को सीधा करें:
घुटनों को मोड़े और एकसाथ रखते हुए, धीरे-धीरे कूल्हों को सीधा करें ताकि मुड़े हुए घुटने छत की ओर इंगित करें। ऐसा महसूस करें कि कूल्हे एक हिंज की तरह धीरे-धीरे खुल रहे हैं। जल्दी में न रहें। कोहनियों पर ध्यान केंद्रित करें और सुनिश्चित करें कि वे जमीन से न उठें। अपने निचले पीठ में संतुलन पर ध्यान दें, ताकि आपका शरीर न आगे गिरे और न पीछे।
चरण 8 – घुटनों को सीधा करें:
धीरे-धीरे घुटनों को सीधा करें, पैरों को ऊपर लाएं। याद रखें कि वजन कोहनियों पर बना रहे और गहरी सांस लें। शुरुआत में 5 सेकंड से शुरू करें, धीरे-धीरे समय बढ़ाकर 15 मिनट तक करें। दैनिक आधार पर 5 से 10 मिनट का समय आदर्श होता है। सिर के योगासन में रहते हुए सांस को चिकना और क्रमबद्ध बनाए रखें। वजन कोहनियों पर बना रहना चाहिए।
उतरने का तरीका
इस आसन से धीरे-धीरे निकलें जैसे आप इसमें गए थे।
– घुटनों को मोड़ें और उन्हें नीचे लाएं।
– अपने पैरों को सीधा करें। पैरों को जमीन पर लाएं और फिर घुटनों को नीचे करें।
– अपने शरीर को इस तरह से नीचे लाएं कि आपके नितंब एड़ियों पर आराम करें, जैसे बच्चे की मुद्रा में।
– अंत में, अपने हाथों को आराम दें और पूर्ण बच्चे की मुद्रा में वापस आएं।
– तुरंत अपना सिर ऊपर न उठाएं। कम से कम एक मिनट तक आराम करें।
– शव मुद्रा में आराम करें, फिर आगे बढ़ें।
ENGLISH VERSION
Headstand (Sirshasana)
Definition: This is an āsana in which you balance on your elbows, arms, and head. Sirshasana is referred to as the “King of the Asanas” due to its remarkable benefits. It is the first of the 12 āsanas and helps improve concentration, enhance memory, and transform sexual energy into powerful life force. Individuals who practice this pose regularly tend to have slower rates of respiration and heart rate. Surprisingly, for first-time practitioners, this pose does not require special strength or flexibility; it is simply a matter of practice and progressing step by step. You can start with the Dolphin pose and gradually work your way up to the full Headstand.
Objective: To relax and energize the entire body.
Contraindications:
Avoid practicing Headstand if you have any of the following conditions:
– High or low blood pressure.
– Glaucoma or recent eye surgery.
– Recent neck injury.
– Menstruation.
Steps for Practice
Step 1 – Define the Space:
Lean forward, wrapping both hands around the opposite elbows, and place your arms about 8 inches away from your knees on the floor in front of you. Keep your buttocks on your heels.
Step 2 – Create a Triangular Base:
Keeping your elbows in place, move your hands forward and interlock your fingers. This creates a strong triangular base with your hands and elbows, with equal weight distributed on all three points. Mentally affirm, “My arms are my legs.”
Step 3 – Place Head on the Floor:
Bend over and place the top part of your head on the floor, firmly pressing the triangle of elbows and hands against the mat, with your hands supporting the back of your head. Do not move the elbows. Keep the neck straight.
Step 4 – Straighten Knees & Lift Hips:
Without moving your head or elbows, straighten your knees and lift your hips. Maintain weight on your elbows. Ensure the elbows remain stationary.
Step 5 – Walk Feet Forward:
Walk your feet forward, trying to keep your knees straight. As your feet come closer to your head, feel your back straightening. Keep walking until your hips are directly over your head. Continue pressing weight on the supporting triangle created by your arms.
Step 6 – Knees to Chest:
Carefully lift your feet off the ground, bending your knees to your chest. This will require using your abdominal and lower back muscles. Bring your feet up toward your buttocks and try to maintain this position. Keep your back straight. Avoid “jumping” or “kicking up,” as you could easily lose balance and fall. Instead, slowly tilt your pelvis backward until you find the point of balance in your lower back. In this position, the weight of your bent legs balances with the weight of your hips and buttocks. Keep as much support as possible on your forearms and hands. Breathe rhythmically and hold this half headstand for up to one minute.
Step 7 – Straighten Hips:
Keeping your knees bent and together, slowly straighten your hips until the bent knees point toward the ceiling. Feel as though your hips are a hinge that is slowly opening. Do not rush. Focus on your elbows and ensure they do not lift off the ground. Also, concentrate on maintaining balance in your lower back, so your body does not topple forward or backward.
Step 8 – Straighten Knees:
Gradually straighten your knees, bringing your feet up. Remember to keep the weight on your elbows and breathe deeply. Start with holding for 5 seconds, gradually increasing the time up to 15 minutes. An ideal duration is 5 to 10 minutes daily. While in the headstand, maintain smooth and rhythmic breathing. The weight should remain on your elbows.
Coming Down
Gently exit this āsana as carefully as you entered it.
– Bend your knees and lower them.
– Straighten your legs. Bring your feet to the ground, and then lower your knees.
– Lower your body so that your buttocks rest on your heels, like in Child’s Pose.
– Finally, relax your hands and return to the full Child’s Pose.
– Do not lift your head up right away. Rest for at least a minute.
– Relax in Corpse Pose before continuing.

